Thursday 16 March 2023

Supplement 306 Pattern 41/42 MMXVII

 Another of my favorite patterns.


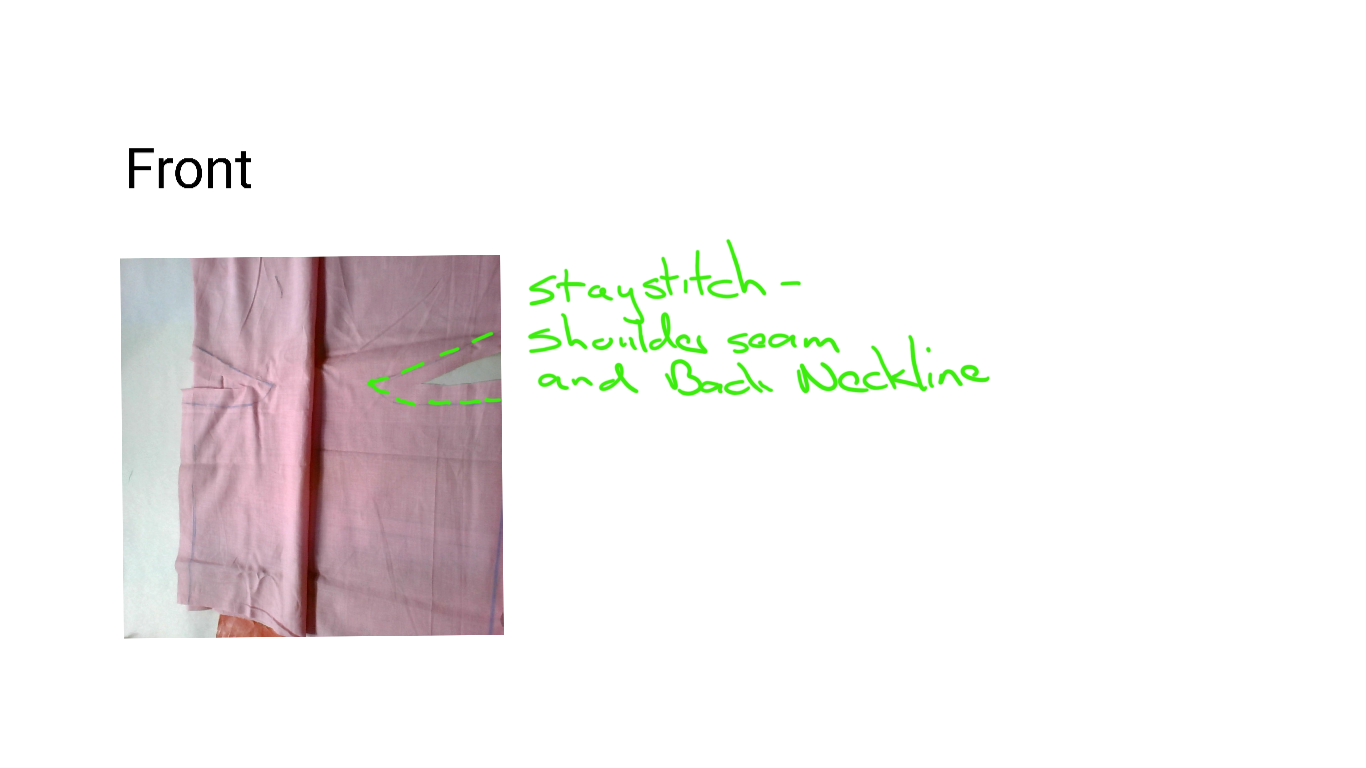
Cutting out and preparing pattern.

The sleeves were lengthened.  I added contrasting colour in the top of the sleeve by just cutting a line through my Pattern and added at the bottom for length. Personally I like long sleeves..... very long.

The cuff a nice wide width. (personal choice)

Zip enclosure Cut 2 bias strips length of zip opening- 1 for the edge of the sleeve side, other for edge of front bodice side.

Bodice Front and Back was lengthen to my preferred length - I lengthened the back 2" longer than the front. Cut 4 bias strips of contrast colour to show of slits on side seams.

Sewing Sequence

Sew sleeves to bodice back - both sides

Sew right side sleeve to front bodice

Sew left side sleeve only bottom bit to left front bodice bit.

Place bias strips on both bodice front and sleeve for zip enclosure.

Sew collar to neck edge. Finish off completely.

Sew zip in place on top of collar and bias binding strips.

Sew underarm of sleeve and bodice front and back together leaving slit sections open 

Sew bias strips to slits Finish off with any size patch at top of slits

I used different colour scrap fabric for my hems and the just topstitching to finish - you can just foldover and stitch your hem in.

Place cuffs in sleeves - I used knit fabric like doing a ribbed cuff.


Thursday 25 June 2020

Retro Trouser

Retro P217/218 

In the olden days patterns were hand drawn and almost every women knew how to sew. So if the pattern's lines didn't match they knew how to correct it themselves. So I thought I'll use this trouser pattern as an example for you to explain myself.


If you look at the back and front of this trouser pattern, you'll see the front is just straight lines and the back is flared. So you either need to straighten the back pattern or flare the front pattern. 

In the next two videos I'll show you how to use your curves on this trouser pattern.

Front Pattern:


Back Pattern:


The next video will show you how to shorten the length of your trousers: 


The next video will show how to shorten your crotch:


Tuesday 3 December 2019

Sleeves

Sewing instructions for sleeve #26 MMVII


Some sleeves just have a bit more to it than just a plain straight forward sleeve.

Give it a try really interesting and very nicely designed sleeve.


Step 1:
Cut out sleeve, Add seam and hem allowances


Step 2:
Cut facings and interfacing for cuff section.
Iron-on interfacing
Mark all notches.


Step 3:
Mark seam allowances.
Mark dart and opening section.


Back of sleeve, with cuff plus iron-on interfacing -
placed right sides together on sleeve
Step 4:
Sew from side on hemline, 
up on placket, horizontal at bottom of dart
down on placket. to other side of hemline to side seam.
                                                                                                                                                     
Step 5:
Cut open placket section and into corners.


Press seams open.


                            Grade seams smaller and corners off at hemlime.
 
 Step 6:
Turn facing and poke corners out.
Press seams flat.

 Step 7:
Pin and sew dart


Press dart flat. I like pressing to both sides
where there is lot of fabric and facing

Tuesday 15 October 2019

Sewing Instructions - Blouse #15 MMXV to Cut-on Cowl neckline (from Threads Magazine)

Front pattern


Staystitch shoulder seams and neckline seams


Sew Center Back seam of Cowl section.

Press seam open and flat


Clip section open at point "A".

Pin shoulder seams together
and pin neckline to back pattern neckline.


Sew neckline and shoulder seam together

Start from center back and
sew to end of shoulder seam

Do other side as well.


Set in sleeves

Hem cowl neckline and hem shirt

Voila!


 Enjoy wearing it!


 Closer picture of cowl-neck!


Transforming Blouse #15 MMXV to Cut-on Cowl neckline (from Threads Magazine)

I like the loose comfortable fit off #15 MMXV
This is my favourite semi-fitted go-to blouse pattern.


I have folded the Facing section away to the center front line (VM-marked on pattern)

This pattern is a semi-fitted pattern just enough ease to my liking.

So I only used the front and back sections.
Below is the changes done to the -
Front and Back pattern.


 I used #176 MMIV sleeve pattern

I used this sleeve, nice and loose fitting....

Not as flared as picture showed in purple but maybe if I do the same pose it will look as the picture.


I'm following the instructions as in threads magazine
Threadsmagazine.com/issue/2019/01/threads-201-Feb-Mar-2019

I'm definitely going to do this in a white cotton fabric or lightweight linen.

I used an old pleated cashmere skirt fabric -
Recycled the fabric just to test my pattern and alterations
The sleeve is a remnant of wool I used and love the result
Picture below at end


Trace bodice front.
Cut pattern along center front line (VM)


Don't add seams or hem allowances.
Adjust neckline and shoulder seamline.

Lower shoulder seamline by 1".
Widen Neckline by 1" at the new shoulder seam.


Create the center-front pleat extension.

Draw 2 lines, parallel to the original center front line,
2 inches and 4 inches beyond center front.
Label the 2" line "Pleat Foldline"
Label the 4" line "Place on Fold"
Extend the neckline and hemline to intersect the lines at right angles.


Begin the cut-on cowl draft.

Extend the "place on fold" line up by 10 and 1/4 inches
(or as desired).
From the top, square a line toward the bodice side.
Extend it beyond the shoulder seamline's outer end.


Establish the back-neck seamline

Draw a line perpendicular to the grainline,
from the shoulder seam neckline end out over the shoulder seam
This is the back neck cutting line.


Draw a parallel line, 5/8" above this -
for the back-neck seamline.
Curve the neck end down gently to meet the shoulder seam at the neckline end -
label this point "A"
On the garment back pattern,
measure the back-neck seamline length.
From point A, measure out along the line the back-neck seamline length - mark this point CB

Draw the cowl's center back seam

From the CB(center back) mark,
draw a line up to the collar's top edge line,
perpendicular to the grainline.

Add seam and hem allowances


Back Pattern Neckline

Mark 1 inch on shoulder seam, from neckline's side.
Reshape back neckline with curve.

Monday 6 August 2018

Help with fitting issues: T-Shirt

If you have fitting issues with Lutterloh patterns, join the Lutterloh Club for personal assistance!
Recently I had a lady that had some Fitting Issues. She joined me and we had a great journey together. She did one amazing job and trusted me. She gave me permission to share our journey.
So we started off with the Fuller Figure pattern in my T-Shirt class - #227

First fit is the paper fitting


When  I see the back doing this sway below the waist.....
It immediately tells me she's short waisted
The minute we do this alteration it will fit better


So now for our first test on cheap fabric.
           
 I'm not happy with the folds  and excess fabric still in the back so I suggested we try a different           T-Shirt pattern #60 FF MMVIII                     
So here we go with new pattern, thanks D


Looks much better, now remember the paper has no stretch so it looks if we need more fabric for the center back and front but the minute we're using stretch fabric it will be fine.

Fabric fit fantastic I love it!  And so do Mrs D


Thank you so much for giving me permission to use your pictures and this great journey we had together. Every now and then I'll do some more fitting issues and sometimes by just using a different pattern we get a much better result.


Monday 21 May 2018

MCC (Minumilist Capsule Challenge ) - Combinations of clothes

This is how my MCC has developed so far a mix of old and new garments 

Bottons 2 :      Trousers - Grey check jeggings ; Black stretch  jeggings
                           Jeans - Black ; Blue

Tops:                 Shirts -       White shirt; Green shirt
                           T-shirts -    Recycled  t-shirt; Striped grey t-shirt; Red t-shirt 
                           Cardigan - Apricot cardigan 
                           Jackets -     Grey short jacket
                                                                                 
                                            
 New clothes: 
                            White shirt;                                              Recycled  T-shirt ;                         
                                                   
Grey check jeggings;                                                                          Black stretch  jeggings


  Old clothes:
  Grey short jacket;                                                            Apricot cardigan 


       Striped grey T-shirt;                                                           Red T-shirt 
                                Black Jeans;                                            Green shirt


Black  Jeans Combo 


Stretch Jeggings  Combo


Stretch Check (grey/white) Jeggings